


Using the Sway Window Manager on Fedora
Maybe some day in your Linux career you’ve heard of “tiling window managers”. I’ve (more or less) ignored them for many years, because I was happy with Gnome Shell and the “normal” way of handling applications on my screen. But when I started my new Linux job, there were no native Linux machine available for my work, so I had to use VirtualBox with its bad graphics performance. Using Gnome, KDE or any other Desktop environment was not really practical.
To get reasonable performance I needed a very lightweight windows manager with no effects and no other fancy stuff, so I ended up giving tiling window managers a try. Since then I’ve used i3 window manager at my job’s workspace. On my private laptop I chose for “Sway”, because it natively supports the Wayland window protocol (and I like Wayland ;-) ). Sway is quite similar to i3, e.g. basic window control keys are almost the same. Still there are some differences, such as configuration of keyboard and mouse.
In this article I’ll show you some parts of my personal Sway configuration and point out several tools that will be useful in your daily work. This is no complete guide which goes into details of installing every tool! Instructions for installation can be found on the projects’ websites.
Overview: This is how my desktop looks like
Installing latest Sway Beta on Fedora
The Sway version in the Fedora repositories is quite outdated, so I decided to add another repo which provides a more recent version of Sway:
sudo dnf copr enable tofik/sway
sudo dnf install sway
You can find the Sway homepage and many docs and tips at https://github.com/swaywm/sway/wiki
Keyboard and mouse / touchpad configuration
Since Sway is using Wayland, it is not only the component which takes care of window management, but also configures input and output devices such as touchpads, keyboards, mice and display outputs. All there devices are configured in the Sway configuration file ~/.config/sway/config.
##
## Input settings (touchpad and keyboard)
##

input "1:1:AT_Translated_Set_2_keyboard" {
        xkb_layout de
}

input "1739:30383:DLL075B:01_06CB:76AF_Touchpad" {
        tap enabled
        natural_scroll enabled
        pointer_accel 0.3
        accel_profile adaptive
        dwt enabled
}

input "1133:45081:MX_Master_2S_Mouse" {
        natural_scroll enabled
}
The identifiers for all devices can be retrieved by the swaymsg -t get_inputs command.
In my configuration these properties are set:
- Laptop keyboard:
- Set layout to “German” (quertz)
- Touch pad:
- Enable “tap = click”
- Enable natural (“inverse”) scrolling
- Set pointer acceleration
- Set pointer acceleration to “adaptive”
- Disables touch pad when typing
- Mouse:
- Enable natural scrolling for my mouse
Find out more about input / output device configuration at https://github.com/swaywm/sway/wiki#input-configuration
Display brightness control
For brightness control we make use of the light tool:
dnf install light
In Sway config:
###
### Screen brightness
###

bindsym XF86MonBrightnessUp exec light -A 5
bindsym XF86MonBrightnessDown exec light -U 5
You can vary the control step size by changing the value at the end of each line.
Bumblebee Status Bar
Project Homepage: https://github.com/tobi-wan-kenobi/bumblebee-status
Be default Sway’s bottom status bar is not the nicest one. I chose the drop-in replacement “Bumblebee Status Bar” instead.

Screenshot of Bumblebee status bar
git clone git://github.com/tobi-wan-kenobi/bumblebee-status
sudo cp -R bumblebee-status /opt
In Sway configuration:
bar {
    position bottom
    colors {
        statusline #ffffff
        background #000000
        inactive_workspace #32323200 #32323200 #5c5c5c
    }
    status_command /opt/bumblebee-status/bumblebee-status -m cpu memory battery date time pasink pasource dnf -p time.format="%H:%M CW %V" date.format="%a, %b %d %Y" -t solarized
}
The status_command line contains a list of enabled modules and their respective settings. Find out more on Github
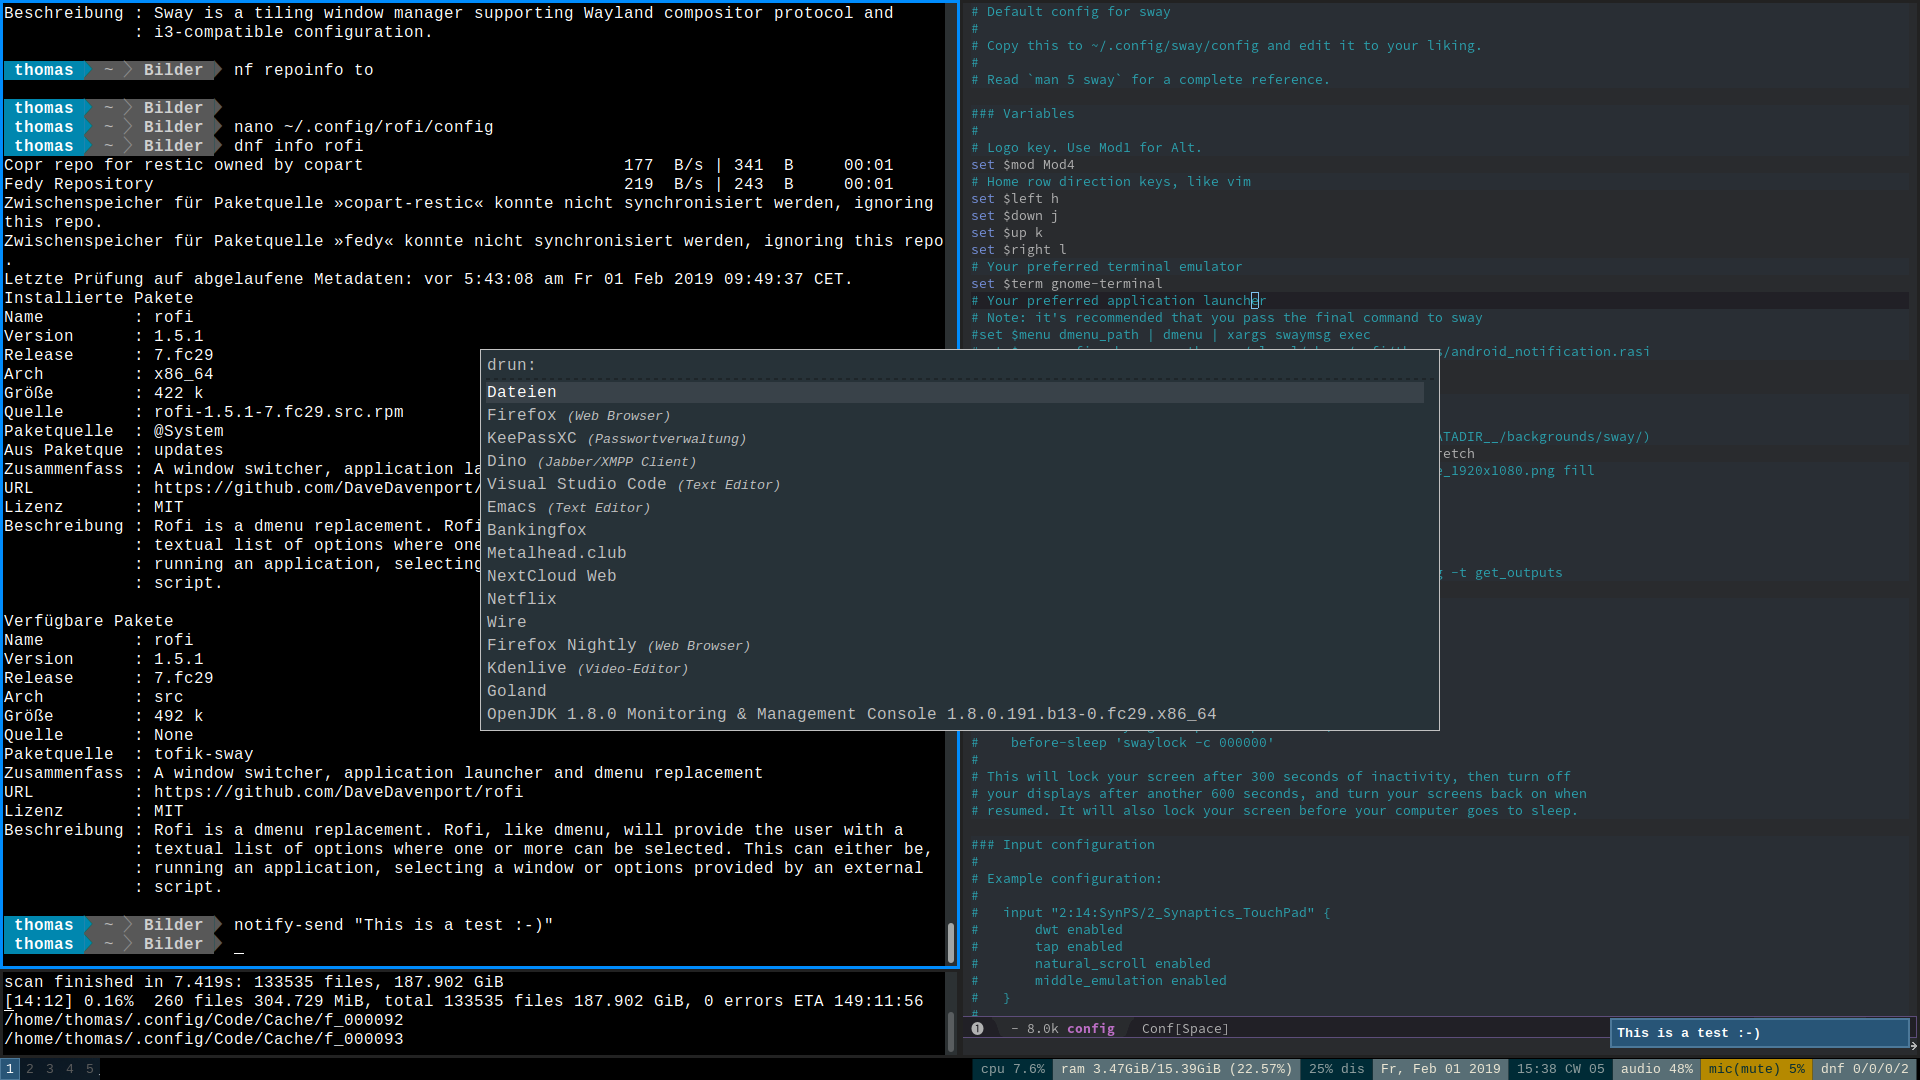
Rofi application launcher
Project Homepage: https://github.com/DaveDavenport/rofi
Rofi Application Launcher
Rofi is available via the official Fedora package repositories. If you want to add more themes to Rofi (like the “android-notifications” theme that I use), you can download more themes here: https://github.com/DaveDavenport/rofi-themes
Sway configuration:
set $menu rofi -show drun
This will make Rofi show up on SUPER + D instead of the default dmenu.
Rofi configuration in ~/.config/rofi/config
rofi.modi:	run,drun,window,ssh
rofi.theme:     ~/.local/share/rofi/themes/android_notification.rasi
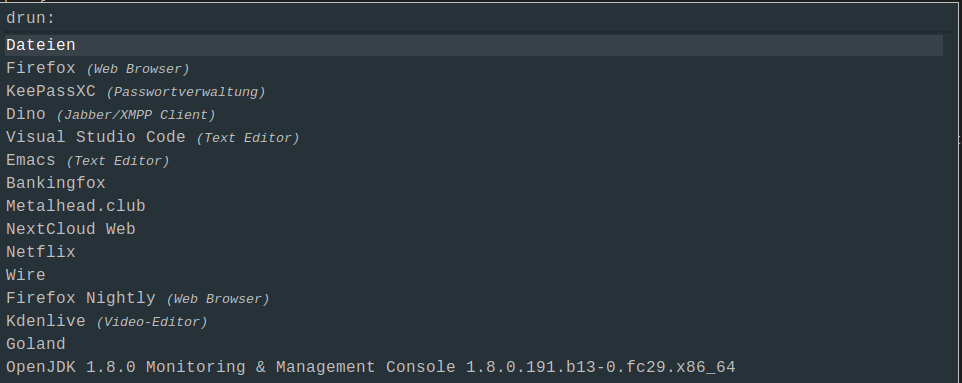
Mako Notification Daemon
Project homepage: https://github.com/emersion/mako
Mako is a desktop notification daemon, which receives notifications from applications such as your e-mail client, your webbrowser or Nextcloud sync client and displays them on your screen.
Mako notification screenshot
Install Mako:
sudo dnf copr enable shengis/mako
sudo dnf install --repo shengis-mako mako
Sway configuration:
exec mako --anchor bottom-right
Screenshots with Grim and Slurp
Grim is a command line tool for making screenshots on Wayland. Slurp is a helper tool that enables screen area selection.
Sway config:
##
## Screenshots via grim and slurp
##

bindsym $mod+Print exec /usr/local/bin/grim -o $(swaymsg -t get_outputs | jq -r '.[] | select(.focused) | .name') $(xdg-user-dir PICTURES)/$(date +'%Y-%m-%d-%H%M%S_grim.png')
bindsym $mod+Shift+Print exec /usr/local/bin/grim -g "$(/usr/local/bin/slurp)" $(xdg-user-dir PICTURES)/$(date +'%Y-%m-%d-%H%M%S_grim.png')
- Pressing SUPER + Print creates a screenshot of the currently selected workplace
- Pressing SUPER + Shift + Print lets the user select an area for capturing
Your screenshots will be saved to your images folder in your home directory, according to your language settings.
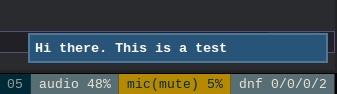
Lockscreen
For the lock screen I use the default Sway screen locker swaylock with a custom background. The background is a screenshot of the current display with a blur effect and some text added.
In /usr/local/bin/lock this file exists:
#!/bin/bash
IMAGE=/tmp/screen.png
TEXT=/tmp/locktext.png

grim -o $(swaymsg -t get_outputs | jq -r '.[] | select(.focused) | .name') /tmp/screen.png

convert /tmp/screen.png -scale 25% -blur 0x2 -scale 400% -fill black -colorize 50% /tmp/screen.png
[[ -f $1 ]] && convert /tmp/screen.png $1 -gravity center -composite -matte /tmp/screen.png

[ -f $TEXT ] || {
    convert -size 1920x60 xc:black -font Liberation-Sans -pointsize 26 -fill white -gravity center -annotate +0+0 'Type password to unlock' $TEXT;
}

convert $IMAGE $TEXT -gravity center -geometry +0+200 -composite $IMAGE
swaylock -s fill -i /tmp/screen.png
The file was made executable via chmod +x /usr/local/bin/lock. A key binding was added to the Sway configuration to enable the screen lock when SUPER+Ctrl+l is pressed on the keyboard:
##
## Screen lock
##

bindsym $mod+Ctrl+l exec /usr/local/bin/lock
This how the lock screen looks like with the above script:
Screenshot screenlock
Autostart
Your autostart applications such as cloud sync daemons and other utilities are added to the Sway configuration like this:
exec nextcloud
… where “nextcloud” is an example of a application to start after login.