


Own mail server based on Dovecot, Postfix, MySQL, Rspamd and Debian 9 Stretch
This how-to is based on my previous German how-to for Ubuntu 16.04 Server. Instead of using Spamassassin, Amavis, Pyzor and Razor as well es OpenDKIM, we’ll make use of Rspamd. Rspamd as a modern replacement will reduce the complexity of our setup and let us monitor its state via a web interface. As in earlier versions of my mailserver how-to, I’ll explain most important parts of the system as we install and configure them one after another. You will need basic Linux and command line knowledge to finish this guide. Going through this article will take probably about 45 minutes - depending on your speed and skills.
Mail server features
To get a basic idea of what this mail server will be capable of:
- Sending and receiving e-mails for various domains of your choice
- Adding and removing domains, accounts, aliases, redirects and TLS policies via a MySQL DB backend
- Per-user mailbox quota
- Global and user-specific sieve rules
- High performance spam server detection via postscreen
- Extended spam message detection via Rspamd (+ web interface for spam stats)
- “Send only” accounts e.g. for NextCloud / blog software / …
- DKIM-signing for outbound e-mails
Please note: There is no “official” management- / web interface for mailbox management, but some users implemented their own mailbox account management software for this setup:
- Florian Kapfenberger: Mailman (not to be confused with Mailman, the mailing list Mmnager!)
- Andreas Bresch: VmailManage
- Henrik Halbritter: MailAdmin
- awidegreen: vmail-rs (CLI tool!)
- pprugger: vmail-admin
- Kekskurse: Go-Mail-Admin
Software for this setup
- Debian 9 “Stretch”
- Postfix
- Dovecot
- Rspamd
- Redis
- MariaDB
- Nginx (optional)
Structural conditions
These domains will be used in this guide as place-holders:
- mysystems.tld: Primary domain for mail accounts and mail system
- mail.mysystems.tld: FQDN (Fully qualified domain name) for mail host
- imap.mysystems.tld: Alias for mail.mysystems.tld, for imap access
- smtp.mysystems.tld: Alias for mail.mysystems.tld, for smtp access
- domain2.tld: (optional) Second domain, for which e-mails shall be sent and received
- domain3.tld: (optional) Third domain, for which e-mails shall be sent and received
All these domains must be replaced by your own throughout this how-to!
Basic requirements
- A virtual or dedicated server with Debian 9 “Stretch” installed. (“Basic system utilities” and SSH installed during Debian setup)
- At least one domain (mysystems.tld) and full control over the DNS zone and its records
For a high quality and yet cheap, European hosting provider I recommend Hetzner.de. A small machine with two cores and 1-2 Gigs of RAM is sufficient in most cases.
Mail system components
Dovecot
Dovecot is a widely spread MDA (Mail Delivery Agent) and an IMAP-server. It moves inbound e-mails into the users’ mailboxes and provides an IMAP interface for MUAs (Mail user agents, such as Mozilla Thunderbird) to retrieve e-mails. Furthermore, Dovecot is our SASL authentication server for Postfix.
Postfix
Postfix as a popular MTA (Mail Transfer Agent) is often combined with Dovecot. While Dovecot handles the mailbox, Postfix does all the e-mail transfer tasks from client to server or from server to server.
MariaDB (MySQL-database)
MariaDB will be the user accounts backend for Postfix and Dovecot. A dedicated database will contain information about our domains, user accounts, aliases and TLS policies. You can add modify and remove datasets during runtime and adapt the mail system to your needs without having to restart any services. As a bonus, the MySQL database is easily accessible e.g. for PHP scripts and you can develop your own management frontend if you wish to.
Rspamd
Rspamd is a modern e-mail filter system, which replaces Amavis and Spamassassin. It also is capable of signing outbound e-mails with DKIM keys. The status of Rspamd can be monitored via a simple web interface.
Nginx (optional)
Nginx is a popular HTTP web server and -proxy. It is used for comfortable and secure access to the Rpspamd webinterface.
Redis
Redis is a high performance Key-Value-Store used by Rspamd. It will store data about recently seen mail servers and spam scores.
Preparation
Tip: Wipe your server
Please consider starting from scratch! If you’ve tried other mail how-tos before, there might be leftovers, which interfere with this guide in some cases. You can avoid trouble by starting with a freshly set up Debian machine.
Login as Root
You will need permananent root access during this tutorial, so switch over to your systems root account:
su
(Enter password for root)
Update system
Get the latest software packages and linux kernel, to make sure everything works fine:
apt update && apt upgrade
you might want to do a reboot to load the latest linux kernel.
Set hostname and FQDN
Your server gets to names: A hostname and a FQDN (Fully qualified domain name).
- Local hostname: For identifying your server in nyour local infrastructure. E.g. “mail”.
- FQDN (Fully Qualified Domain Name): For identifying your server on the internet. E.g. “mail.mysystems.tld”
You do not need to fit your mail server’s FQDN to any domain you want to serve with it. These domains do not need to be the same or similar. Set your local hostname as follows:
hostnamectl set-hostname --static mail
The configuration file /etc/hosts contains FQDN and local hostname next to each other. It should be similar to this one:
127.0.0.1	localhost
127.0.1.1	mail.mysystems.tld	mail

::1         localhost ip6-localhost ip6-loopback
ff02::1     ip6-allnodes
ff02::2     ip6-allrouters
If you enter the “hostname” and “hostname –fqdn” commands, this should be your output:
root@mail:~# hostname
mail
root@mail:~# hostname --fqdn
mail.mysystems.tld
Furthermore, the FQDN (“mail.mysystems.tld”) is copied to /etc/mailname:
echo $(hostname -f) > /etc/mailname
(The hostname in your shell prompt will adapt after a reboot)
Tipp: Install Unbound DNS Resolver
Rspamd, Postfix / Postscreen and more services on your system heavily depend on DNS requests. I strongly recommend to install Unbound as a local DNS resolver and -cache! Some server providers rate-limit your access to their pre-defined DNS resolvers, which might cause trouble. Especially Rspamd does a lot of DNS requests depending on the mail system load. Furthermore, Spamhaus blocklists often can be used with own DNS resolvers only (we are going to use Spamhaus with postscreen).
Install unbound:
apt install unbound
Update DNSSEC Root key and reload Unbound service:
su -c "unbound-anchor -a /var/lib/unbound/root.key" - unbound
systemctl reload unbound
A dig @127.0.0.1 denic.de +short +dnssec should result in a similar output like this:
dig @127.0.0.1 denic.de +short +dnssec
81.91.170.12
A 8 2 3600 20170814090000 20170731090000 26155 denic.de. Jo90qnkLkZ6gI4qNHj19BMguFuGof9hCPhdeSh/fSePSQ/WXlWMmfjW1 sNDJ/bcITRMyz8DQdDzmWPDIeSJ/qPyfoZ+BjUZxtaXcs0BAl4KX8q7h R05TGmAbgPhrYBoUKJkU/q8T+jWKHAJRUeWbCd8QOJsJbneGcUKxRAPe i6Rq51/OL/id6zUCtalhclah2TfLLaqku9PmKwjbGdZm11BXSr8b56LB WX/rdLIrKWNpE+jHGAUMmDsZL84Kx3Oo
If the dig-command worked, you can now set Unbound as the primary DNS resolver for your mail system:
apt install resolvconf
echo "nameserver 127.0.0.1" >> /etc/resolvconf/resolv.conf.d/head
result of nslookup denic.de | grep Server should now be:
Server: 127.0.0.1
Now you have your own DNS resolver up and running. Let’s continue with DNS configuration …
DNS zone setup
You need some DNS records set up for your mailsystem to work. Browse the management interface of your DNS provider and look for the zone files of your domains. Then add the records shown below:
Point your system’s FQDN to its IPv4 address (and - if you have one - to your IPv6 address)
mail.mysystems.tld. 86400 IN A    5.1.76.155
mail.mysystems.tld. 86400 IN AAAA 2a00:f820:417::be19:7b23
“imap.mysystems.tld” and “smtp.mysystems.tld” are aliases for “mail.mysystems.tld”. They are not absolutely necessary, but considered “good style”. Many mail clients are looking for these domain names if you set up a new mail account.
imap.mysystems.tld. 86400 IN CNAME mail.mysystems.tld.
smtp.mysystems.tld. 86400 IN CNAME mail.mysystems.tld.
Now let’s create some MX records: Other mail servers need these to figure out, which host is responsible for mails on a certain domain. We want the host on “mail.mysystems.tld” to responsible for all e-mails, which go to @mysystemd.tld mail addresses.
mysystems.tld. 86400 IN MX 0 mail.mysystems.tld.
… and we also want it to handle e-mails for “domain2” and “domain3”:
domain2.tld. 86400 IN MX 0 mail.mysystems.tld.
domain3.tld. 86400 IN MX 0 mail.mysystems.tld.
(the last three entrys have to be created in their corresponding zone files)
Reverse DNS
A reverse DNS record (also called “PTR record” matches a FQDN to an IP-address. Many popular e-mail providers check other mail server’s PTR records and deny receiving e-mails from them, if they cannot find a proper domain name to their IPs. You will need PTR records for all your server’s IP-addresses. They all must point to mail.mysystems.tld. In most cases reverse DNS entries can be set via your server hoster’s web interface or via the server support team.
SPF records
SPF records were invented to support the fight against spam servers. Unfortunately it turned out as a miss-conception and you cannot rely on these records anymore. SPF describes which mail servers are allowed to send e-mails for a domain and which are not. In some cases (e.g. mailing lists) the SPF concept does not work. Still some providers expect you to set a SPF record - if you don’t, you’ll get some point off your “spam credibility score”. So let’s make a compromise and provide a neutral SPF record:
mysystems.tld. 3600 IN TXT v=spf1 a:mail.mysystems.tld ?all
Old-schooled, bad mail providers will be satisfied, and yet we don’t support bad SPF practices. The SPF record is also set for your other domains “domain2” and “domain3”, but in a slightly different way:
domain2.tld. 3600 IN TXT v=spf1 include:mysystems.tld ?all
DMARC records
DMARC records set rules for foreign mail servers, which tell them how to deal with non-authenticated or incorrectly authenticated e-mails. If a spammer sends a fake e-mail and uses your domain mysystems.tld, the receiving server will consult the DNS and ask for the DMARC record. If it finds out that SPF or DKIM fail (which will be the case), the server will proceed according to the DMARC record. It is a good idea to reject such e-mails:
_dmarc.mysystems.tld. 3600 IN TXT v=DMARC1; p=reject;
Set the DMARC record for your other domains accordingly:
_dmarc.domain2.tld. 3600 IN TXT v=DMARC1; p=reject;
You can create your own DMARC policy records on https://elasticemail.com/dmarc/.
Set up TLS certificates
A modern e-mail server can’t be operated seriously without TLS certificates. We will use Let’s Encrypt certificates for this purpose, as they are free and yet accepted by all browsers, mail clients and operating systems. If you already have valid certificates, you can use them instead.
Retrieve new certificates
Use the official “certbot” command line client to get new certificates for your mail system:
apt install certbot
certbot certonly --standalone --rsa-key-size 4096 -d mail.mysystems.tld -d imap.mysystems.tld -d smtp.mysystems.tld
After having agreed to the terms of use and having provided your e-mail address you will instantly get valid certificates. They are saved at: /etc/letsencrypt/live/mail.mysystems.tld and are valid for your three mail system domain names:
- mail.mysystems.tld
- imap.mysystems.tld
- smtp.mysystems.tld
Your additional domains “domain2” and “domain3” do not need to be included into this certificate.
There are some new files in /etc/letsencrypt/live/mail.mysystems.tld which you will need:
- cert.pem: Your mailserver certificate
- chain.pem: CA certificate
- fullchain.pem: mailserver certificate + CA certificate
- privkey.pem: Private key for mailserver certificate
Later in this guide only the letter two certificate files will be used.
Auto-Renewal
Let’s encrypt certificates are valid for 90 days only, so they should be renewed in fixed intervals. You can achieve that via a cronjob:
@weekly certbot renew --pre-hook "systemctl stop nginx" --post-hook "systemctl start nginx" --renew-hook "systemctl reload nginx; systemctl reload dovecot; systemctl reload postfix" --quiet
This entry is added to the crontab file via
crontab -e
(select your favorite editor, paste the line above and save your changes)
MySQL database setup
Install MariaDB as a DBMS (database management system)
apt install mariadb-server
MariaDB should be running right after its installation. You can check the service status via systemctl status mysql (not “mariadb!”). In case it is not yet running, start it: systemctl start mysql.
mysql
will get you into the MySQL shell. A few SQL commands have to be executed there to set up the database structure. Tip: Copy and paste the following SQL commands, to make sure they are formatted correctly:
Create a new database named “vmail”:
create database vmail
    CHARACTER SET 'utf8';
Create database user “vmail”, with password “vmaildbpass”. This user will be used by Postfix and Dovecot. It is granted “select” permissions on this DB.
grant select on vmail.* to 'vmail'@'localhost' identified by 'vmaildbpass';
Now move your SQL shell to the new database:
use vmail;
The following SQl commands do not need to be modified. Just copy them as they are and paste them into your SQL command line.
Domain table
CREATE TABLE `domains` (
    `id` int unsigned NOT NULL AUTO_INCREMENT,
    `domain` varchar(255) NOT NULL,
    PRIMARY KEY (`id`),
    UNIQUE KEY (`domain`)
);
The domain table contains all domains, which shall be served by the mail server.
Account table
CREATE TABLE `accounts` (
    `id` int unsigned NOT NULL AUTO_INCREMENT,
    `username` varchar(64) NOT NULL,
    `domain` varchar(255) NOT NULL,
    `password` varchar(255) NOT NULL,
    `quota` int unsigned DEFAULT '0',
    `enabled` boolean DEFAULT '0',
    `sendonly` boolean DEFAULT '0',
    PRIMARY KEY (id),
    UNIQUE KEY (`username`, `domain`),
    FOREIGN KEY (`domain`) REFERENCES `domains` (`domain`)
);
The account table contains all data regarding user mailbox accounts, such as username, domain, password, and quota. Quota is in Megabyte (MB). If the “enabled” field if set to “true” a mailbox account is active and can be used. If “sendonly” is set to “true” this account is not able to receive mails.
Alias table
CREATE TABLE `aliases` (
    `id` int unsigned NOT NULL AUTO_INCREMENT,
    `source_username` varchar(64) NOT NULL,
    `source_domain` varchar(255) NOT NULL,
    `destination_username` varchar(64) NOT NULL,
    `destination_domain` varchar(255) NOT NULL,
    `enabled` boolean DEFAULT '0',
    PRIMARY KEY (`id`),
    UNIQUE KEY (`source_username`, `source_domain`, `destination_username`, `destination_domain`),
    FOREIGN KEY (`source_domain`) REFERENCES `domains` (`domain`)
);
The alias table contains all alias definitions / redirects.
TLS Policy table
CREATE TABLE `tlspolicies` (
    `id` int unsigned NOT NULL AUTO_INCREMENT,
    `domain` varchar(255) NOT NULL,
    `policy` enum('none', 'may', 'encrypt', 'dane', 'dane-only', 'fingerprint', 'verify', 'secure') NOT NULL,
    `params` varchar(255),
    PRIMARY KEY (`id`),
    UNIQUE KEY (`domain`)
);
The TLS policy table defines policies regarding TLS-encryption to foreign mail servers (more about that later).
Now leave the SQL shell again, to get back to your Debian Bash Shell:
quit;
vmail-user and vmail-directory
All e-mails and sieve scripts are saved into a special directory /var/vmail. Only the associated “vmail”-user has access to it. Dovecot will use this user account to do its operations on the file system.
Create vmail-directory:
mkdir /var/vmail
Create vmail-user
adduser --disabled-login --disabled-password --home /var/vmail vmail
Create some vmail subdirectories:
mkdir /var/vmail/mailboxes
mkdir -p /var/vmail/sieve/global
vmail-user gets all permissions on /var/vmail:
chown -R vmail /var/vmail
chgrp -R vmail /var/vmail
chmod -R 770 /var/vmail
Install and configure Dovecot
Install the following Dovecot components:
apt install dovecot-core dovecot-imapd dovecot-lmtpd dovecot-mysql dovecot-sieve dovecot-managesieved
- dovecot-core: Dovecot core
- dovecot-imapd: IMAP for Dovecot
- dovecot-lmtp: LMTP (Local Mail Transfer Protocol) for Dovecot; LMTP is used as a transmission protocol between Postfix and Dovecot.
- dovecot-mysql: MySQL support for Dovecot
- dovecot-sieve: Filter module
- dovecot-managesieved: Filter management server
Dovecot is started automatically after installation. Stop is as long as we don’t have a proper configuration:
systemctl stop dovecot
All the Dovecot configuration files sit in ``/etc/dovecot/`. As we are going to create a Dovecot configuration from scratch, you can delete all the existing files:
rm -r /etc/dovecot/*
cd /etc/dovecot
We’ll just need two configuration files in our case: dovecot.conf and dovecot-sql.conf. Create them both in /etc/dovecot/ a follows:
Main configuration file dovecot.conf
###
### aktivated protocols
#############################

protocols = imap lmtp sieve


###
### TLS configuration
#######################

ssl = required
ssl_cert = </etc/letsencrypt/live/mail.mysystems.tld/fullchain.pem
ssl_key = </etc/letsencrypt/live/mail.mysystems.tld/privkey.pem
ssl_cipher_list = EDH+CAMELLIA:EDH+aRSA:EECDH+aRSA+AESGCM:EECDH+aRSA+SHA256:EECDH:+CAMELLIA128:+AES128:+SSLv3:!aNULL:!eNULL:!LOW:!3DES:!MD5:!EXP:!PSK:!DSS:!RC4:!SEED:!IDEA:!ECDSA:kEDH:CAMELLIA128-SHA:AES128-SHA
ssl_prefer_server_ciphers = yes


###
### Dovecot services
################################

service imap-login {
    inet_listener imap {
        port = 143
    }
}


service managesieve-login {
    inet_listener sieve {
        port = 4190
    }
}


service lmtp {
    unix_listener /var/spool/postfix/private/dovecot-lmtp {
        mode = 0660
        group = postfix
        user = postfix
    }

    user = vmail
}


service auth {
    ### Auth socket für Postfix
    unix_listener /var/spool/postfix/private/auth {
        mode = 0660
        user = postfix
        group = postfix
    }

    ### Auth socket für LMTP-Dienst
    unix_listener auth-userdb {
        mode = 0660
        user = vmail
        group = vmail
    }
}


###
###  Protocol settings
#############################

protocol imap {
    mail_plugins = $mail_plugins quota imap_quota imap_sieve
    mail_max_userip_connections = 20
    imap_idle_notify_interval = 29 mins
}

protocol lmtp {
    postmaster_address = postmaster@mysystems.tld
    mail_plugins = $mail_plugins sieve
}


###
### Client authentication
#############################

disable_plaintext_auth = yes
auth_mechanisms = plain login


passdb {
    driver = sql
    args = /etc/dovecot/dovecot-sql.conf
}

userdb {
    driver = sql
    args = /etc/dovecot/dovecot-sql.conf
}


###
### Mail location
#######################

mail_uid = vmail
mail_gid = vmail
mail_privileged_group = vmail


mail_home = /var/vmail/mailboxes/%d/%n
mail_location = maildir:~/mail:LAYOUT=fs


###
### Mailbox configuration
########################################

namespace inbox {
    inbox = yes

    mailbox Spam {
        auto = subscribe
        special_use = \Junk
    }

    mailbox Trash {
        auto = subscribe
        special_use = \Trash
    }

    mailbox Drafts {
        auto = subscribe
        special_use = \Drafts
    }

    mailbox Sent {
        auto = subscribe
        special_use = \Sent
    }
}


###
### Mail plugins
############################


plugin {
    sieve_plugins = sieve_imapsieve sieve_extprograms
    sieve_before = /var/vmail/sieve/global/spam-global.sieve
    sieve = file:/var/vmail/sieve/%d/%n/scripts;active=/var/vmail/sieve/%d/%n/active-script.sieve

    ###
    ### Spam learning
    ###
    # From elsewhere to Spam folder
    imapsieve_mailbox1_name = Spam
    imapsieve_mailbox1_causes = COPY
    imapsieve_mailbox1_before = file:/var/vmail/sieve/global/learn-spam.sieve

    # From Spam folder to elsewhere
    imapsieve_mailbox2_name = *
    imapsieve_mailbox2_from = Spam
    imapsieve_mailbox2_causes = COPY
    imapsieve_mailbox2_before = file:/var/vmail/sieve/global/learn-ham.sieve

    sieve_pipe_bin_dir = /usr/bin
    sieve_global_extensions = +vnd.dovecot.pipe

    quota = maildir:User quota
    quota_exceeded_message = Benutzer %u hat das Speichervolumen überschritten. / User %u has exhausted allowed storage space.
}
Settings to adjust:
- ssl_cert: Path to certificate file
- ssl_key: Path to certificate key
- postmaster_address: Fit to your primary domain
SQL configuration file dovecot-sql.conf
driver=mysql
connect = "host=127.0.0.1 dbname=vmail user=vmail password=vmaildbpass"
default_pass_scheme = SHA512-CRYPT

password_query = SELECT username AS user, domain, password FROM accounts WHERE username = '%n' AND domain = '%d' and enabled = true;
user_query = SELECT concat('*:storage=', quota, 'M') AS quota_rule FROM accounts WHERE username = '%n' AND domain = '%d' AND sendonly = false;
iterate_query = SELECT username, domain FROM accounts where sendonly = false;
Settings to adjust:
- Database password “vmaildbpass”
Set proper permissions for dovecot-sql.conf:
chmod 440 dovecot-sql.conf
Global sieve filter to move marked spam mails
Create a new Sieve filter script spam-global.sieve in /var/vmail/sieve/global/
require "fileinto";

if header :contains "X-Spam-Flag" "YES" {
    fileinto "Spam";
}

if header :is "X-Spam" "Yes" {
    fileinto "Spam";
}
Spam learning with Rspamd
Rspamd shall learn from its mistakes if you move a mail out of your “Spam” folder and vice versa. Sieve recognizes the moving process and triggers a Rspam learning process.
Create to following two sieve config files in /var/vmail/sieve/global/:
learn-spam.sieve
require ["vnd.dovecot.pipe", "copy", "imapsieve"];
pipe :copy "rspamc" ["learn_spam"];
learn-ham.sieve
require ["vnd.dovecot.pipe", "copy", "imapsieve", "environment", "variables"];

if environment :matches "imap.mailbox" "*" {
    set "mailbox" "${1}";
}

if string "${mailbox}" "Trash" {
    stop;
}

pipe :copy "rspamc" ["learn_ham"];
Install and configure Postfix
Install:
apt install postfix postfix-mysql
During installation of the Postfix packages you will be asked what type of configuration you want to create. Select “No configuration”. Then stop Postfix:
systemctl stop postfix
Although you selected “No configuration” there will be configuration files in /etc/postfix. Delete some of them:
cd /etc/postfix
rm -r sasl
rm master.cf main.cf.proto master.cf.proto
Then create the following new config files in /etc/postfix:
main.cf
##
## Network settings
##

mynetworks = 127.0.0.0/8 [::ffff:127.0.0.0]/104 [::1]/128
inet_interfaces = 127.0.0.1, ::1, 5.1.76.152, 2a00:f820:417::7647:b2c2
myhostname = mail.mysystems.tld


##
## Mail queue settings
##

maximal_queue_lifetime = 1h
bounce_queue_lifetime = 1h
maximal_backoff_time = 15m
minimal_backoff_time = 5m
queue_run_delay = 5m


##
## TLS settings
###

tls_preempt_cipherlist = yes
tls_ssl_options = NO_COMPRESSION
tls_high_cipherlist = EDH+CAMELLIA:EDH+aRSA:EECDH+aRSA+AESGCM:EECDH+aRSA+SHA256:EECDH:+CAMELLIA128:+AES128:+SSLv3:!aNULL:!eNULL:!LOW:!3DES:!MD5:!EXP:!PSK:!DSS:!RC4:!SEED:!IDEA:!ECDSA:kEDH:CAMELLIA128-SHA:AES128-SHA


### Outbound SMTP connections (Postfix as sender)

smtp_tls_security_level = dane
smtp_dns_support_level = dnssec
smtp_tls_policy_maps = mysql:/etc/postfix/sql/tls-policy.cf
smtp_tls_session_cache_database = btree:${data_directory}/smtp_scache
smtp_tls_protocols = !SSLv2, !SSLv3
smtp_tls_ciphers = high
smtp_tls_CAfile = /etc/ssl/certs/ca-certificates.crt


### Inbound SMTP connections

smtpd_tls_security_level = may
smtpd_tls_protocols = !SSLv2, !SSLv3
smtpd_tls_ciphers = high
smtpd_tls_session_cache_database = btree:${data_directory}/smtpd_scache

smtpd_tls_cert_file=/etc/letsencrypt/live/mail.mysystems.tld/fullchain.pem
smtpd_tls_key_file=/etc/letsencrypt/live/mail.mysystems.tld/privkey.pem


##
## Local mail delivery to Dovecot via LMTP
##

virtual_transport = lmtp:unix:private/dovecot-lmtp


##
## Spam filter and DKIM signatures via Rspamd
##

smtpd_milters = inet:localhost:11332
non_smtpd_milters = inet:localhost:11332
milter_protocol = 6
milter_mail_macros =  i {mail_addr} {client_addr} {client_name} {auth_authen}
milter_default_action = accept


##
## Server Restrictions for clients, cecipients and relaying
## (concerning S2S-connections. Mailclient-connections are configured in submission-section in master.cf)
##

### Conditions in which Postfix works as a relay. (for mail user clients)
smtpd_relay_restrictions =      reject_non_fqdn_recipient
                                reject_unknown_recipient_domain
                                permit_mynetworks
                                reject_unauth_destination


### Conditions in which Postfix accepts e-mails as recipient (additional to relay conditions)
### check_recipient_access checks if an account is "sendonly"
smtpd_recipient_restrictions = check_recipient_access mysql:/etc/postfix/sql/recipient-access.cf


### Restrictions for all sending foreign servers ("SMTP clients")
smtpd_client_restrictions =     permit_mynetworks
                                check_client_access hash:/etc/postfix/without_ptr
                                reject_unknown_client_hostname


### Foreign mail servers must present a valid "HELO"
smtpd_helo_required = yes
smtpd_helo_restrictions =   permit_mynetworks
                            reject_invalid_helo_hostname
                            reject_non_fqdn_helo_hostname
                            reject_unknown_helo_hostname

# Block clients, which start sending too early
smtpd_data_restrictions = reject_unauth_pipelining


##
## Restrictions for MUAs (Mail user agents)
##

mua_relay_restrictions = reject_non_fqdn_recipient,reject_unknown_recipient_domain,permit_mynetworks,permit_sasl_authenticated,reject
mua_sender_restrictions = permit_mynetworks,reject_non_fqdn_sender,reject_sender_login_mismatch,permit_sasl_authenticated,reject
mua_client_restrictions = permit_mynetworks,permit_sasl_authenticated,reject


##
## Postscreen Filter
##

### Postscreen Whitelist / Blocklist
postscreen_access_list =        permit_mynetworks
                                cidr:/etc/postfix/postscreen_access
postscreen_blacklist_action = drop


# Drop connections if other server is sending too quickly
postscreen_greet_action = drop


### DNS blocklists
postscreen_dnsbl_threshold = 2
postscreen_dnsbl_sites = zen.spamhaus.org*2
postscreen_dnsbl_action = drop


##
## MySQL queries
##

virtual_alias_maps = mysql:/etc/postfix/sql/aliases.cf
virtual_mailbox_maps = mysql:/etc/postfix/sql/accounts.cf
virtual_mailbox_domains = mysql:/etc/postfix/sql/domains.cf
local_recipient_maps = $virtual_mailbox_maps


##
## Miscellaneous
##

### Maximum mailbox size (0=unlimited - is already limited by Dovecot quota)
mailbox_size_limit = 0

### Maximum size of inbound e-mails (50 MB)
message_size_limit = 52428800

### Do not notify system users on new e-mail
biff = no

### Users always have to provide full e-mail addresses
append_dot_mydomain = no

### Delimiter for "Address Tagging"
recipient_delimiter = +
Settings to adjust:
- inet_interfaces: IP addresses of your server.
5.1.76.152, 2a00:f820:417::7647:b2c2must be replaced by your own IPv4- and IPv6-address. - myhostname: Replace by your own hostname
- smtpd_tls_cert_file: Path to certificate file
- smtpd_tls_key_file: Path to certificate key
Configuration file master.cf
# ==========================================================================
# service type  private unpriv  chroot  wakeup  maxproc command + args
#               (yes)   (yes)   (no)    (never) (100)
# ==========================================================================
smtp      inet  n       -       y       -       1       postscreen
    -o smtpd_sasl_auth_enable=no
smtpd     pass  -       -       y       -       -       smtpd
dnsblog   unix  -       -       y       -       0       dnsblog
tlsproxy  unix  -       -       y       -       0       tlsproxy
submission inet n       -       y       -       -       smtpd
    -o syslog_name=postfix/submission
    -o smtpd_tls_security_level=encrypt
    -o smtpd_sasl_auth_enable=yes
    -o smtpd_sasl_type=dovecot
    -o smtpd_sasl_path=private/auth
    -o smtpd_sasl_security_options=noanonymous
    -o smtpd_client_restrictions=$mua_client_restrictions
    -o smtpd_sender_restrictions=$mua_sender_restrictions
    -o smtpd_relay_restrictions=$mua_relay_restrictions
    -o milter_macro_daemon_name=ORIGINATING
    -o smtpd_sender_login_maps=mysql:/etc/postfix/sql/sender-login-maps.cf
    -o smtpd_helo_required=no
    -o smtpd_helo_restrictions=
    -o cleanup_service_name=submission-header-cleanup
pickup    unix  n       -       y       60      1       pickup
cleanup   unix  n       -       y       -       0       cleanup
qmgr      unix  n       -       n       300     1       qmgr
tlsmgr    unix  -       -       y       1000?   1       tlsmgr
rewrite   unix  -       -       y       -       -       trivial-rewrite
bounce    unix  -       -       y       -       0       bounce
defer     unix  -       -       y       -       0       bounce
trace     unix  -       -       y       -       0       bounce
verify    unix  -       -       y       -       1       verify
flush     unix  n       -       y       1000?   0       flush
proxymap  unix  -       -       n       -       -       proxymap
proxywrite unix -       -       n       -       1       proxymap
smtp      unix  -       -       y       -       -       smtp
relay     unix  -       -       y       -       -       smtp
showq     unix  n       -       y       -       -       showq
error     unix  -       -       y       -       -       error
retry     unix  -       -       y       -       -       error
discard   unix  -       -       y       -       -       discard
local     unix  -       n       n       -       -       local
virtual   unix  -       n       n       -       -       virtual
lmtp      unix  -       -       y       -       -       lmtp
anvil     unix  -       -       y       -       1       anvil
scache    unix  -       -       y       -       1       scache
submission-header-cleanup unix n - n    -       0       cleanup
    -o header_checks=regexp:/etc/postfix/submission_header_cleanup
Header cleanup rules
Create a new file /etc/postfix/submission_header_cleanup with this content:
### Removes headers of MUAs for privacy reasons

/^Received:/            IGNORE
/^X-Originating-IP:/    IGNORE
/^X-Mailer:/            IGNORE
/^User-Agent:/          IGNORE
SQL configuration
SQL queries for Postfix sit in the sql/ subdirectory:
mkdir /etc/postfix/sql && cd $_
Create these files with their corresponding content:
accounts.cf
user = vmail
password = vmaildbpass
hosts = 127.0.0.1
dbname = vmail
query = select 1 as found from accounts where username = '%u' and domain = '%d' and enabled = true LIMIT 1;
aliases.cf
user = vmail
password = vmaildbpass
hosts = 127.0.0.1
dbname = vmail
query = select concat(destination_username, '@', destination_domain) as destinations from aliases where source_username = '%u' and source_domain = '%d' and enabled = true;
domains.cf
user = vmail
password = vmaildbpass
hosts = 127.0.0.1
dbname = vmail
query = SELECT domain FROM domains WHERE domain='%s'
recipient-access.cf
user = vmail
password = vmaildbpass
hosts = 127.0.0.1
dbname = vmail
query = select if(sendonly = true, 'REJECT', 'OK') AS access from accounts where username = '%u' and domain = '%d' and enabled = true LIMIT 1;
sender-login-maps.cf
user = vmail
password = vmaildbpass
hosts = 127.0.0.1
dbname = vmail
query = select concat(username, '@', domain) as 'owns' from accounts where username = '%u' AND domain = '%d' and enabled = true union select concat(destination_username, '@', destination_domain) AS 'owns' from aliases where source_username = '%u' and source_domain = '%d' and enabled = true;
tls-policy.cf
user = vmail
password = vmaildbpass
hosts = 127.0.0.1
dbname = vmail
query = SELECT policy, params FROM tlspolicies WHERE domain = '%s'
Don’t forget to modify vmaildbpass in all of the above files, in case you are using another password!
Set proper permissions for /etc/postfix/sql:
chmod -R 640 /etc/postfix/sql
More Postfix configuration files
Create two new files in /etc/postfix. You can leave them empty.
touch /etc/postfix/without_ptr
touch /etc/postfix/postscreen_access
In without_ptr you can define entries like this:
1.2.3.3 OK
This will result in a policy, which allows server 1.2.3.3 to send e-mails to this host even if it does not have a valid PTR-record. After every change, without_ptr has to be converted into a database file and Postfix must be reloaded:
postmap /etc/postfix/without_ptr
systemctl reload postfix
For the moment, just create an empty database file:
postmap /etc/postfix/without_ptr
In postscreen_access you can define exceptions for the postscreen filter. If any mail server is blocked by postscreen and you want to grant access for any reason, add an entry similar to the following:
1.2.3.3 permit
You can do the opposite, too: If you always want to block a certain server, add “reject” instead of “permit”.
Execute
newaliases
to create the alias database file /etc/aliases.db. This file is expected by Postfix by default.
Rspamd
The official Debian repositories contain an outdated version of Rspamd, so use the Rspamd-Repository for installation instead:
apt install -y lsb-release wget
wget -O- https://rspamd.com/apt-stable/gpg.key | apt-key add -
echo "deb http://rspamd.com/apt-stable/ $(lsb_release -c -s) main" > /etc/apt/sources.list.d/rspamd.list
echo "deb-src http://rspamd.com/apt-stable/ $(lsb_release -c -s) main" >> /etc/apt/sources.list.d/rspamd.list
Update package sources and install Rspamd:
apt update
apt install rspamd
Stop Rspamd service
systemctl stop rspamd
Basic configuration
Following files are now created in /etc/rspamd/local.d/:
/etc/rspamd/local.d/options.inc: Network settings and definition of the DNS resolver to use.
local_addrs = "127.0.0.0/8, ::1";

dns {
    nameserver = ["127.0.0.1:53:10"];
}
/etc/rspamd/local.d/worker-normal.inc: Settings for the normal Rspamd worker
bind_socket = "localhost:11333";
### Anzahl der zu nutzenden Worker. Standard: Anzahl der virtuellen Prozessorkerne.
# count = 1
/etc/rspamd/local.d/worker-controller.inc: Worker controller settings: Password for web interface access, e.g.:
password = "$2$qecacwgrz13owkag4gqcy5y7yeqh7yh4$y6i6gn5q3538tzsn19ojchuudoauw3rzdj1z74h5us4gd3jj5e8y";
The password hash ("$2$ …") must be generated by
rspamadm pw
before. Enter a password you would like to set, copy the hash and paste it into the configuration file above (instead of my example hash).
/etc/rspamd/local.d/worker-proxy.inc: Worker proxy (Milter-Module for Postfix)
bind_socket = "localhost:11332";
milter = yes;
timeout = 120s;
upstream "local" {
    default = yes;
    self_scan = yes;
}
/etc/rspamd/local.d/logging.inc: Error logging
type = "file";
filename = "/var/log/rspamd/rspamd.log";
level = "error";
debug_modules = [];
Milter Headers /etc/rspamd/local.d/milter_headers.conf
use = ["x-spamd-bar", "x-spam-level", "authentication-results"];
authenticated_headers = ["authentication-results"];
Use Redis for Bayesian filter: /etc/rspamd/local.d/classifier-bayes.conf
backend = "redis";
DKIM signing
Rspamd not only handles spam mail filtering, but also is capable of signing e-mails via DKIM. First, a signing key must be created:
mkdir /var/lib/rspamd/dkim/
rspamadm dkim_keygen -b 2048 -s 2017 -k /var/lib/rspamd/dkim/2017.key > /var/lib/rspamd/dkim/2017.txt
chown -R _rspamd:_rspamd /var/lib/rspamd/dkim
chmod 440 /var/lib/rspamd/dkim/*
2017 is the name of the DKIM key (also called “selector”). I’m using the current year as a name. For a DKIM signing key (/var/lib/rspamd/dkim/2017.key) there is also a corresponding public key, which has to be published in the DNS. An example of a record with this key is given in /var/lib/rspamd/dkim/2017.txt
Output example DNS record with public key:
cat /var/lib/rspamd/dkim/2017.txt
Example output:
2017._domainkey IN TXT ( "v=DKIM1; k=rsa; "
	"p=MIIBIjANBgkqhkiG9w0BAQEFAAOCAQ8AMIIBCgKCAQEA2/al5HqXUpe+HUazCr6t9lv2VOZLR369PPB4t+dgljZQvgUsIKoYzfS/w9NagS32xZYxi1dtlDWuRfTU/ahHO2MYzE0zHE4lMfwb6VkNCG+pM6bAkCwc5cFvyRygwxAPEiHAtmtU5b0i9LY25Z/ZWgyBxEWZ0Wf+hLjYHvnvMqewPsduUqKVjDOdUqeBb1VAu3WFErOAGVUYfKqFX"
	"+yfz36Alb7/OMAort8A5Vo5t5k0vxTHzkYYg5KB6tLS8jngrNucGjyNL5+k0ijPs3yT7WpTGL3U3SEa8cX8WvOO1fIpWQz4yyZJJ1Mm62+FskSc7BHjdiMHE64Id/UBDDVjxwIDAQAB"
) ;
The important part starts with v=DKIM1 and ends with AQAB (in this example). Now put this part of the output into a new DNS record. To illustrate the process, I did this step for my DNS hoster and made a screenshot:
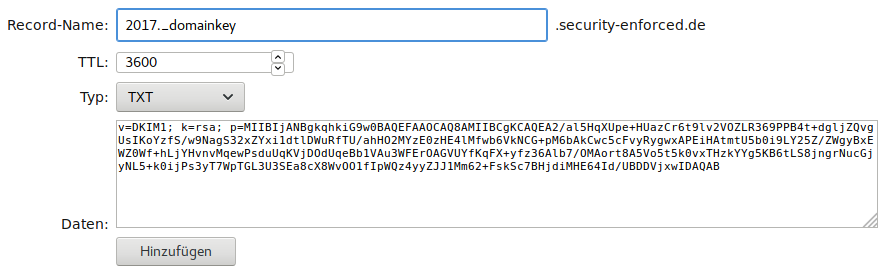
core-networks.de Screenshot mit DKIM Record
Make sure the _domainkey-subdomain-prefix matches your selector prefix! (“2017”) The DKIM Record must be added to every domain / zone file in use - not only your primary domain!
-b 1024 instead of -b 2048 and running the rspamadm dkim_keygen command again.Create /etc/rspamd/local.d/dkim_signing.conf and set “2017” as the selector:
path = "/var/lib/rspamd/dkim/$selector.key";
selector = "2017";

### Enable DKIM signing for alias sender addresses
allow_username_mismatch = true;
This configuration is also copied to /etc/rspamd/local.d/arc.conf, since the ARC module makes use of the same parameters.
cp -R /etc/rspamd/local.d/dkim_signing.conf /etc/rspamd/local.d/arc.conf
Redis
Rspamd uses Redis as a data cache. Installation is simple:
apt install redis-server
/etc/rspamd/local.d/redis.conf
servers = "127.0.0.1";
Start Rspamd
systemctl start rspamd
Nginx Proxy for Rspamd web interface (optional)
So get easy and secure access to the Rspamd web interface, you can install Nginx as a HTTP proxy with TLS-termination. As an alternative, access via a SSH tunnel is sufficient in some cases (see below).
Installation:
apt install nginx
nano /etc/nginx/sites-available/mail.mysystems.tld
Config file /etc/nginx/sites-available/mail.mysystems.tld
server {
    listen 80;
    listen [::]:80;
    listen 443 ssl http2;
    listen [::]:443 ssl http2;

    ssl_certificate /etc/letsencrypt/live/mail.mysystems.tld/fullchain.pem;
    ssl_certificate_key /etc/letsencrypt/live/mail.mysystems.tld/privkey.pem;

    server_name mail.mysystems.tld;

    root /var/www/default;

    if ($ssl_protocol = "") {
        return 301 https://$server_name$request_uri;
    }

    location /rspamd/ {
        proxy_pass http://localhost:11334/;
        proxy_set_header Host $host;
        proxy_set_header X-Forwarded-For $proxy_add_x_forwarded_for;
    }
}
Settings to adapt:
- ssl_certificate: Path to certificate
- ssl_certificate_key: Path to certificate key
- server_name
Activate site configuration, reload and start Nginx:
ln -s /etc/nginx/sites-available/mail.mysystems.tld /etc/nginx/sites-enabled/mail.mysystems.tld
nginx -t
systemctl reload nginx
Apache proxy for Rspamd web interface (optional, not checked!)
Install Apache2:

    apt install apache2

Enable proxy module and restart Apache2:

    a2enmod proxy
    a2enmod proxy_http
    systemctl restart apache2

Configuration ```/etc/apache2/sites-available/mailserver.conf```:

    <VirtualHost *:80>
        ServerName mail.mysystems.tld
        Redirect / https://mail.mysystems.tld/
    </VirtualHost>


    <VirtualHost *:443>
        ServerName mail.mysystems.tld
        ServerPath /
        DocumentRoot /var/www
        DirectoryIndex index.html

        SSLEngine on
        SSLHonorCipherOrder on
        SSLCertificateFile /etc/letsencrypt/live/mail.mysystems.tld/fullchain.pem
        SSLCertificateKeyFile /etc/letsencrypt/live/mail.mysystems.tld/privkey.pem


        ###
        ### Rspamd
        ###

        RewriteEngine on
        RewriteRule ^/rspamd$ /rspamd/ [R]
        ProxyPreserveHost On
        ProxyPass /rspamd http://localhost:11334/
        ProxyPassReverse /rspamd http://localhost:11334/
    </VirtualHost>

Activate new configuration and reload Apache2

    a2ensite mailserver
    systemctl reload apache2
Access web interface via webbrowser
You should now be able to access the Rspamd web interface via https://mail.mysystems.tld/rspamd/ . Then enter the password you chose during Rspamd configuration.
"/var/lib/rspamd/ [...]: map file is unavailable for reading". Just ignore them, since this is a bug. (See: https://github.com/vstakhov/rspamd/issues/1474)Access Rspamd web interface via SSH tunnel (alternative to Nginx)
If your local machine is a Linux or MAC computer, enter the following command to bind the webinterface to your local TCP port 8080:
ssh -L 8080:localhost:11334 benutzer@mail.mysystems.tld -N
The web interface can then be browsed via http://localhost:8080. CTRL+C cancels the connection.
Train Rspamd with existing spam mail (optional)
If you have mailboxes in Maildir-format with spam e-mails and normal e-mails, you can use them to train Rspamd on some real world examples. Copy those mailbox folders to your new server and execute commands like this:
Train e-mails in ./oldserver/var/vmail/mailboxes/*/*/mail/Spam/cur as spam:
find ./oldserver/var/vmail/mailboxes/*/*/mail/Spam/cur -type f -exec /usr/bin/rspamc learn_spam {} \;
Train e-mails as “ham”:
find ./oldserver/var/vmail/mailboxes/*/*/mail/cur -type f -exec /usr/bin/rspamc learn_ham {} \;
find ./oldserver/var/vmail/mailboxes/*/*/mail/Sent/cur -type f -exec /usr/bin/rspamc learn_ham {} \;
Create domains, accounts, aliases and TLS-policies in database
Before the mailserver can be used reasonably, at least one domain and a corresponding user account must be existent. Fire up your msql command shell one more time:
mysql
… change to the vmail database:
use vmail;
Create a new domain data record
New user accounts can only be created for already existing domains, so create a new data set for your primary domain:
insert into domains (domain) values ('mysystems.tld');
Create a new user account
Now that the corresponding domains exists, a new user account for this domain can be created. But there is one step left to do: Before the SQL statement for a new account is executed, we need a hash of the passwort to be used with this account. Create a new password hash in the normal Bash Shell(!) via:
doveadm pw -s SHA512-CRYPT
A password hash looks similar to this:
{SHA512-CRYPT}$6$wHyJsS.doo39xoCu$KI1N4l.Vd0ZWYj5BYLI8AdK7ACwAZaM18gSy7Bko0dG2Hvli4.KfAmLk2ztFVP.R4T7oqiu7clKBehCTc4GGw0
Now copy that hash and save it somewhere else - you’ll need it in a few moments. First, paste the following into your SQL Shell(!):
insert into accounts (username, domain, password, quota, enabled, sendonly) values ('user1', 'mysystems.tld', '{SHA512-CRYPT}$6$wHyJsS[...]', 2048, true, false);
The value for the password field must now be replaced with the individual hash you’ve created before. In this example, an account for “user1@mysystems.tld” is created, with a storage quota of 2 GB, and the account is able to send and receive messages.
Create new alias address
Creating an alias address for another address is pretty streight forward:
insert into aliases (source_username, source_domain, destination_username, destination_domain, enabled) values ('alias', 'mysystems.tld', 'user1', 'mysystems.tld', true);
This would result in a re-direction of e-mails from alias@mysystems.tld to user1@mysystems.tld. If you want to implement a something like a poor man’s mailing list, you can create multiple alias entries such as:
team@domain.tld => user1@domain.tld
team@domain.tld => user2@domain.tld
team@domain.tld => user3@domain.tld
Define a new TLS policy (optional)
TLS policies let you specify how strong a connection to another mailserver must be secured. There are different levels of security and verification:
- none: Don’t use encryption
- may: Encrypt, if supported by other server. Self-signed certificates are accepted, because there is no certificate verification.
- encrypt: Always encrypt. Self-signed certificates are accepted, because there is no certificate verification.
- dane: If there are valid TLSA-records in the DNS, encryption is mandatory. The certificate is then verified via DANE. If invalid TLSA records are found, fallback is “encrypt”. If no TLSA-records are found, fallback is “may”.
- dane-only: Encrypted connections only. Certificate verification via DANE. No fallback to weaker methods.
- verify: Encrypted connections only. Certificate must be issued by an accepted CA. Hostname given in MX record must match hostname in certificate.
- secure: Encrypted connections only. Certificate must be issued by an accepted CA. Hostname in certificate must by domain or subdomain of e-mail domain. No DNS used.
Example:
insert into tlspolicies (domain, policy) values ('mailbox.org', 'dane-only');
The “params” field is used for additional verification details, such as “match” parameters. E.g. for GMX Mail you would define:
insert into tlspolicies (domain, policy, params) values ('gmx.de', 'secure', 'match=.gmx.net');
But why? Well, if “secure” as a mechanism is chosen, Postfix will find out the domain part of the recipient’s mail address. For GMX that could be thomas@gmx.de for example. Now Postfix would only allow connections to mail hosts, which have “gmx.de” in their hostname, such as host1.gmx.de, host2.gmx.de and so on. The problem here is, that GMX has no hosts running at “*gmx.de”. They are running at gmx.NET instead. So the “secure” policy must be extended with match=.gmx.net - otherwise connections to GMX mail servers would fail.
You can now leave the SQL shell again by entering quit;
Start all the things!
Let’s get the party started! \o/
systemctl start dovecot
systemctl start postfix
Postfix does not re-start properly after a reboot because of bug #877992. To fix this behavior, run:
systemctl enable postfix@-
(note the “-” at the end of the line!)
You may want to check if everything is working fine. Enter
tail -f /var/log/syslog
or
tail -f /var/log/mail.log
to check if any errors occur.
Connect to your new mail server
- IMAP-Server: mail.mysystems.tld | Port: 143 | STARTTLS (also use this server for domain2 und domain3!)
- SMTP-Server: mail.mysystems.tld | Port: 587 | STARTTLS (also use this server for domain2 und domain3!)
- (optional Managesieve: mail.mysystems.tld | Port: 4190 | STARTTLS) (also use this server for domain2 und domain3!)
- Username: Complete(!) e-mail address
- Password: … you should know ;-)
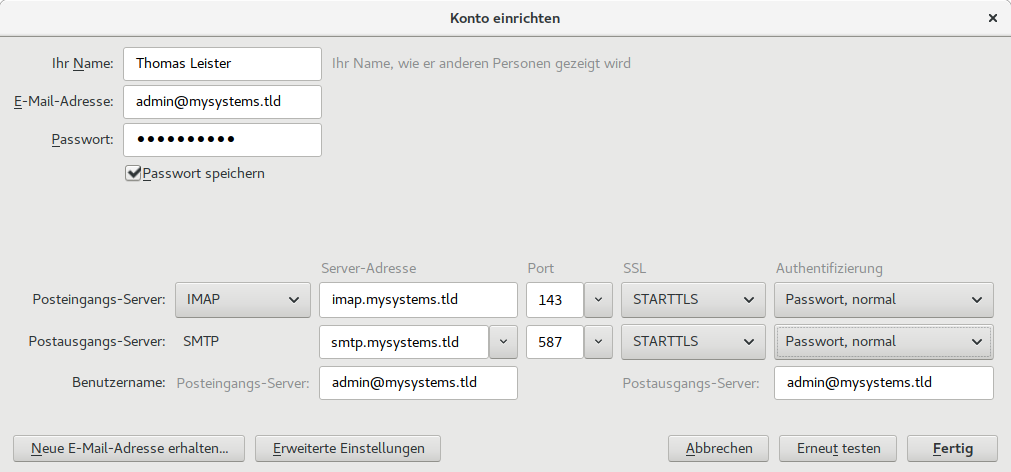
Login data for Thunderbird
Test your spam filter
Send an e-mail with the following body content to one of your new mailboxes:
XJS*C4JDBQADN1.NSBN3*2IDNEN*GTUBE-STANDARD-ANTI-UBE-TEST-EMAIL*C.34X
This e-mail should never arrive at its destination and Rspamd should show a rejected e-mail in its history log.
Did you like my how-to?
If you like this how-to, you maybe want to appreciate it by giving some dollars?
As you may know, developing, writing and testing a how-to is much work - especially for more complex setups like a mail server. If you want to say "thanks", help me pay my test servers or just keep me motivated, please consider donating a few dollars. :-)
Thanks a lot! :-)
Q&A
“Am I allowed to copy / republish your how-to?”
No, please don’t to that. You can keep private copies, if you want.
“Is there a web interface for managing user accounts / domains / … ?”
Currently there is only one finished web interface by Andreas Bresch: https://github.com/Andreas-Bresch/vmailManage/
Changelog
(Published on 04.08.2017)
2017-08-29
- vmail MySQL user gets “select” permissions instead of “all” permissions
- master.cf: More services run in chroot for better security. “mua” parameters to submission part and to main.cf
2017-08-31
- Added: Copy dkim_signing.conf to arc.conf to prevent error
cannot load dkim key /var/lib/rspamd/arc/domain.tld.arc.key - Added:
non_smtpd_milters = inet:localhost:11332to DKIM-sign e-mails from mailserver itself, too.
- Added: Copy dkim_signing.conf to arc.conf to prevent error
2017-10-25
- Deprecated Dovecot-Antispam replaced by ImapSieve + two more sieve scripts.
2017-10-27
- Removes deprecated ADSP and adds DMARC section.
2017-11-06
- Workaround concerning Bug #877992 added.
2017-11-12
- Added hint for “Mailman” web based management GUI.
2017-12-05
- Added Apache2 configuration for Rspamd proxy
2018-01-19
- dovecot.conf: Removed obsolete settings
ssl_dh_parameters_lengthandssl_protocols - Added
/etc/rspamd/local.d/classifier-bayes.conf - Minor style improvements / fixes
- Added warning concerning Ubuntu Server
- dovecot.conf: Removed obsolete settings
2018-01-20
- Added hint: Henrik Halbritter’s “MailAdmin”
2018-01-22
- Added Dovecot PPA for Ubuntu Server
2018-02-02
tls_preempt_cipherlist = yesadded to Postfix main.cf
2018-03-30
- Added hint: You have to add the DKIM record for every mail domain!
2019-03-02
- Fixes learn-ham behavior
24.03.2025: Manitu DNSBL removed - is not maintained anymore