


Make LXD use your server's public network interface
By default LXD creates an internal network bridge called lxdbr0 which new containers are attached to (a network bridge in Linux is similar to a physical LAN switch). That way containers can talk to each other on the same network. Even the LXD host is connected to the same bridge. To make a service in a container reachable from the outside world, a proxy is used in most cases, e.g. Nginx for web services and HAProxy for any other services.
But what if you cannot or do not like to connect a service via a proxy? No problem! LXD can not only make use of a “host internal” network bridge, but any network bridge on your system. So let’s set up a network bridge that is linked to a public interface! The container’s network configuration will be similar to the one on your container host. A public IP address can be used directly.
Set up LXD host
First we need to prepare the LXD host. Probably you have a network configuration similar to the following (ens3 is the public interface):
/etc/network/interfaces
source /etc/network/interfaces.d/*

# The loopback network interface
auto lo
iface lo inet loopback

# The primary network interface
allow-hotplug ens3
iface ens3 inet static
       address 1.2.3.2/24
       gateway 1.2.3.1
       dns-nameservers 1.2.3.1
       dns-search mydomain.tld

iface ens3 inet6 static
       address fd00::2/64
       gateway fd00::1
       dns-nameservers fd00::1
       dns-search mydomain.tld
By default your network looks like this:
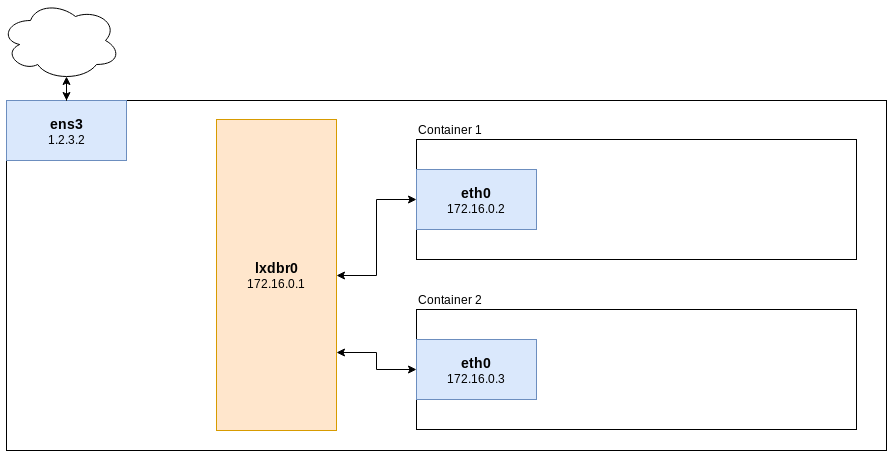
Your container environment (including the lxdbr0 bridge) is entirely separated from the internet. Let’s change that!
We need to introduce a new network bridge interface br0 on the host system and configure it similar to the ens3 interface. The configuration of the ens3 interface is removed and the old interface it is just attached to the bridge.
Make sure bridge-utils are installed:
apt install bridge-utils
New network configuration (ens3 is replaced by br0 + some extra attributes):
source /etc/network/interfaces.d/*

# The loopback network interface
auto lo
iface lo inet loopback

# The primary network interface
allow-hotplug ens3

auto br0
iface br0 inet static
	address 1.2.3.2/24
	gateway 1.2.3.1
	dns-nameservers 1.2.3.1
	dns-search mydomain.tld
	bridge_ports ens3
	bridge_fd 5
	bridge_stp yes

iface br0 inet6 static
	address fd00::2/64
	gateway fd00::1
	dns-nameservers fd00::1
	dns-search mydomain.tld
	bridge_ports ens3
	bridge_fd 5
	bridge_stp yes
Create a new container profile
Create new LXD container profile which will give containers direct access to the public bridge (we’ll call the new profile “extbridge”):
lxc profile create extbridge
EDITOR=nano lxc profile edit extbridge
Change the “description” attribute and the “devices” YAML tree:
config: {}
description: Lets containers use public network interface
devices:
  eth0:
    name: eth0
    nictype: bridged
    parent: br0
    type: nic
name: extbridge
used_by: []
Use new container profile
When creating new containers, assign the default profile and the new extbridge profile:
lxc launch -p default -p extbridge images:debian/9 mydebiancontainer
To assign the new profile to existing containers use:
lxc profile assign myexistingcontainer default,extbridge
Configure network in container
Example for configuration:
allow-hotplug eth0
iface ens3 inet static
	address 1.2.3.3/24
	gateway 1.2.3.1
	dns-nameservers 1.2.3.1
	dns-search mydomain.tld

iface eth0 inet6 static
	address fd00::3
	gateway fd00::1
	dns-nameservers fd00::1
	dns-search mydomain.tld
Also add your network’s DNS resolver (usually the gateway) to /etc/resolv.conf (because resolvconf package is not installed, yet, so DNS sresolvers are not read from /etc/network/interfaces file)
/etc/resolv.conf
nameserver 1.2.3.1
nameserver fd00::1
Restart networking:
systemctl restart networking
Now you should have a working internet connection. Don’t forget to install resolvconf:
apt update
apt install resolvconf
Your network now looks like this:

Done! :-)
Special case: Additional IPv4 /32 addresses in containers using the main interface MAC
Some hosters (like Netcup and Hetzner) apply restrictions to their networks that bind IP addresses to certain MAC addresses. Your alias IP addresses will work if you use them on your main interface or your br0 interface, but they will be blocked if you use if on another interface, which’s interface MAC address is unknown to your provider, such as virtual interfaces in a container.
There are usually two ways of resolving this problem: You can either ask your provider to bind an IP address to another MAC address, or route your alias IP address via your bridge’s IP address. That will make network packages origin from your main interface (and the main interface’s MAC address). I will show you the latter method, which is based to the configuration in the first section.
Make sure the following settings are set in /etc/sysctl.conf:
net.ipv4.ip_forward=1
net.ipv6.conf.all.forwarding=1
net.ipv6.conf.all.proxy_ndp=1
Apply these settings:
sysctl -p
Create a bridge device similar to the one on the first section of this guide, but add a post-up line with a suitable route for every additional /32 IP address that you’d like to use inside a container:
auto br0
iface br0 inet static
	address 1.2.3.2
	[...]
	post-up route add 2.2.2.1 dev br0
	post-up route add 2.2.2.2 dev br0
	post-up route add 2.2.2.3 dev br0
	[...]
(1.2.3.2 is your hosts’s main IP address and 2.2.2.x addresses are alias addresses)
Inside your container you need to use br0s IP address 1.2.3.2 as a gateway. Your container’s network configuration will probably look similar to this:
auto eth0
iface eth0 inet static
        address 2.2.2.1
        netmask 255.255.255.255
        gateway 1.2.3.2
Restart your networking service at both, your host and your container:
systemctl restart networking
(Thanks to https://anysrc.net/post/gnu-linux/netcup-kvm-vserver-lxc-proxmox for the hint!)